Sunday, February 17, 2013

Get every pixel out of G5

For several years I've been looking for a way to sharpen my photos and meanwhile remove noise and keep details, especially for high ISO. M43 sensors are noisy, especially at high ISO.

After playing with all the latest major raw converters, DxO Optics Pro 8.1.2, Lightroom 4.3, Capture One 7.0.2 and Silkypix 5.0.28, I finally found it.

The trick is quite simple: import a RAW file into DOP, use all the default auto settings, process it to a DNG file. Import this DNG file into Lr, use all default settings, export to JPG.

That's it, the output is tack sharp and purely clean, with all the details.

Compared to OOC JPEG (please ignore the color difference caused by WB):


Some notes

When you import a raw or jpg file into DOP the first time, it'll automatically detect and download the camera and lens comb profile into its database and use the info to do corrections such as CA, distortion, vignetting and lens softness. I think DOP does these jobs better than others, it also does a much better job at noise reduction and detail retention.

If you find too much detail loss with a high ISO photo, you may click on the RAW noise tag in DOP, move the Luminance detail slide from about 35 down to 10 or even 5. This of course will increase the noise level, but you'll get significantly more details. ISO 3200, 35 vs. 10:


If colors do not look right to you, you may change white balance in Lr from "as shot" to "auto" or even manually tweak it to your full satisfaction.

The reason to use Lr after DOP is to further sharpen up the photo without noise increase. Of course, Lr is fully featured for many touch ups you might need, such as spot removal, auto WB, clarity and vibrance etc. Trust me, neither DOP nor Lr alone can reach the sharpness and low noise at the same time. C1 does not support G5, it won't even take the DNG file.

The left is from DOP and the right is further after Lr (with auto WB):


Overall, this procedure produces the finest photos among OOC and any single RAW converter. Although I must admit that G5's jpeg is very acceptable compared to earlier Panasonic cameras, RAW is still better for high ISO shots.

ISO 2500 OOC, Silkypix and DOP+Lr:


A few more samples from this DOP+Lr procedure, all auto, no touch up:


Magic of DOP

A very interesting side finding: DOP can produce more pixels beyond the frame!!! This kind of proves that the sensor in G5 is indeed the one in GH2. Panasonic hide the extra pixels in G5, but DOP somehow can see them if focal length is 18mm or shorter. This also indicates how superior DOP is when dealing with M43 systems.

The photo below is from the same RAW as above, but developed directly in Lr without going through DOP first. DOP is by far the only one that can see the extra pixels, all other raw converters and the camera itself can't.


Magic of Lr

I used to hate post processing, because they are time consuming and the results never look natural. The magic of DOP+Lr is bestly showing in the following ISO 3200 sample. First, DOP did automatically and fantastically exposure compensation, especially on black recovery. I did not do any manual adjustment, now we see the black hat and many other things we could not see. Then, all I did was to click once the 2x button for clarity and vibrance in Lr, everything else was default.


Did the same for the photo below, notice how much better are the colors, details and layers. I love these two features: clarity and vibrance, they are truly magic. Clarity sharpens photos without noise increase and vibrance saturates colors naturally without overdone:


Abstract in Chinese

M43相机的传感器的噪声偏大,尤其是高感下,所以困扰了我好几年的难题就是如何提高清晰度。往往是锐度提高了,噪声也跟着增大;或者把噪声压下去的话,细节又被抹去太多。最近捣鼓了几个最新的顶级RAW转换软件之后,终于碰巧发现了一个既完美还非常简单的方法,那就是先用DXO Optics Pro 8.1.2生成DNG文件,然后再用Lightroom 4.3将它转换成JPEG。期间都用默认的设置,不须什么复杂的操作,最多调一下照度细节和白平衡,就能获得非常干净、解析度极高、细节非常丰富的片子。如果在Lr里再加一点清晰度和自然饱和度,效果就更好了,而且没有副作用。

Monday, February 11, 2013

A few photos from G5's JPEG

No any post processing, right out of the camera's JPEG. Lens was a Panasonic 14-45mm f/3.5-5.6. The settings are:

Vivid mode, C-1, S+1, S+1, NR-1; i.D low; i.R extended; AWB AB-1 GM-1; A mode, f/3.5-5.6


Finally, tablets do AVCHD

Tablets have been marketed to be able to play 1080p, not entirely true until recently; none of them could play the AVCHD video from my Panasonic cameras. Now with Tegra 3 and Mali 400MP (Cortex-A8) GPU, tablets finally play AVCHD.


In above picture taken in an OfficeMax store, the three on the top shelf all can play AVCHD flawlessly. They are:

  • ASUS TF300T, NVIDIA Tegra 3 Quad-Core, need install DicePlayer, 10", $299.
  • Michley Tivax MiTraveler 970, Cortex-A8, native player, 10", $229.
  • Azpen A701, Cortex-A8, native player, 7", $129
The Michley has a 4:3 screen like iPad, but the screen seems very low quality. Nexus 7 has a Tegra 3 Q-C processor too, I guess it can play AVCHD fine.

A big surprise is: Samsung Tab 2 still cannot play my AVCHD files! Some users claim no problem though, maybe with the bsplayer?

I wish Pantech or other manufacturers make something like the Element, i.e., 4:3 7-8" 4G, with a processor that does AVCHD, then my dream tablet finally arrives.

Abstract in Chines

索尼和松下的高档相机和摄像机的视频采用AVCHD格式,iOS(iPad)和Android平板电脑一直都播放不了。采用NVDIA Tegra 3 四核或Cortex-A8 Mali 400这些较新的芯片的平板现在终于都可以流畅地播放了!比如ASUS TF300T,Michley Tivax 970和Azpen A701等。令人费解的是,三星的银河2还是不行。我梦想的平板是像Pantech Element那样:4:3 7至8寸的屏幕,内置4G,再加上能播放AVCHD。

Sunday, February 10, 2013

Port out of Google Voice

Why you want to do this? Because GV offers a batch of numbers for you to pick up one that you like. Porting out, say, to PagePlusCellular, is easy and cost only $1.

First you need to create a GV account if you don't have one yet and pick up a number that you like, such as one with lots of 7s, 8s or 0s. Log into your GV account, and set up the voicemail PIN to the last 4 digits of the phone number. Then go to this link:

https://www.google.com/voice/unlock


Click the "Unlock my number" button and you'll be prompted for a $3 charge. If this is a number that you ported in (see this article) to GV, then there is no charge:


Once you paid the money, the number will be unlocked, ready for porting out. You may also relock it in case you change your mind:


Now go to your carrier to start the port in. For PPC, for example, you fill a port-in form on its website:
  • Customer Contact Number : for PPC to contact you in case of any trouble
  • Phone Number : GV #
  • ESN/MEID : find it on your phone
  • Current Carrier : Google Voice
  • Account Number : GV #
  • Account Pass Code : GV voicemail PIN or last 4 digits
  • Account Holder's First Name : required; if you ever give one to GV, use that
  • Account Holder's Last Name : see above
  • Billing Address : must be a valid address even if you never give one to GV, or PPC won't start the port-in process
  • Billing City : see above
  • Billing State : see above
  • Billing Zip : see above
It'll take about 1-2 days and you can find the status in your GV account (notice the status is now "Approved"):


If you have an Android phone, you can use the "PagePlusStatus" app by WUSCI to check the status of the phone #, it should say "active" with a $2 balance. Dial *22890 and you are done.

Abstract in Chinese

Google Voice的号码是免费的,而且提供多个让你挑选。如果你愿意,可以把号码转到手机上,比如PagePlusCellular等。先要花3美金解除GV号码的锁定,然后就可以到PPC的网站去填表申请转号。填表时地址一栏一定要用有效的,否则申请无效。一般2天左右就成了,可以在GV的账号里查看结果。PPC会送你2美金话费,所以最后下来的花费是1美金。如果这个号码原来就是转到GV去的,那么再转出来的时候不收那3美金。

Absolutely secure chat, email and file transfer

In the name of anti terrorist, we all are naked to the government, not just at airport security checks, but at the front of your computer too when you email or send a text message or file to someone. After some research, I've found the only absolutely secure method for encrypting your content before you send it to someone. I have not found a clean and straight tutorial about it, so here we go.

Initial Setup

Download "gpg4win-1.1.4.exe" from here. The latest version does not work in my case.

Double click on it to install and the only options you should check are GnuPG2 and GPA. After installation, simply open GPA and everything is straightforward.


First thing first, you'll need to create your key pair with key manager's key generation wizard. Name and email can be fake if you prefer, but you should make them easy for your friends to recognize you. Never forget your password, you need it whenever you decrypt anything!


Open GPA, highlight your key and export your key as a *.asc key file. Email this file to your partner.


Ask your partner to do the same as above and email you his/her *.asc key file.

Once you received the *.asc file from your partner, open GPA and import it. Your partner should do the same, i.e, import the *.asc file that you sent to him/her.

From now on, you two no longer need to do above again and you're ready to share encrypted content. Do the same with other partners.

Hint: only the receiver needs to send his/er key to the sender so that the sender can encrypt the content with the key. The receiver does not need sender's key but must remember his/er own password for decryption. So, again, never forget your password!

Send a File

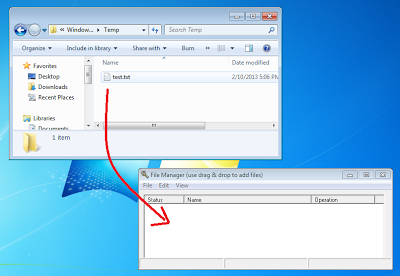
To send a file, drag the file into GPA's file manager. Select "Encrypt", check the key(s) of your partner(s) and an encrypted file will be generated. You can then email this encrypted file to your partner(s) or upload it to somewhere, secure or insecure, for them to download.


Once s/he received the encrypted file, drag and drop it into GPA's File Manager, select "Decrypt". S/he will be prompted for password, use the one when s/he created hi/her own key, not yours, and both of you should never give your password to anyone.

Email and Messaging

You type your email and message as usual. Once you've written everything, select and cut the entire text. Open GPA's Clipboard, Encrypt. Go back to your email/message and paste, you'll see something like this:


Go ahead and click the send button. Once your partner received your message, s/he copy above weird text and open GPA's Clipoboard, Decrypt. Now paste to Notepad and s/he'll see the original text:


Some notes

There are many such software, but they all have some problems. For example, Retroshare is very difficult to connect to the other party; they should have added a button to email your IP and port to the other party, but NAT is still a problem.  ZeZebra posts a link to a server, defeating your privacy. With TrueCrypt and many other such tools, you have to send a passcode to the receiver, then how do you send the passcode securely? Chicken and egg.

With the procedure described above, there is no 3rd party involved and no any password exchange. Even if a 3rd person has got the encrypted content, s/he cannot do anything about it, even if s/he also has your public keys. You should never expose your private (secrete) key, but even if someone somehow stole your private key, s/he still need the password to decrypt. Nothing can be securer than this.

The only thing be careful: when one party receives a key, make sure to verify it with each other. For example, if you received a key looks like from me (KoT <xxx@gmail.com>), you must verify it with me before you send out anything serious. Because, anyone can generate a key that looks like from "KoT <xxx@gmail.com>". Each key has an unique fingerprint, you may verify that or checksum.

During installation, you may select some other features, such as GPGee that allows shell integration so you can conveniently right click on a file and encrypt it. You may also try the latest version of GPG4Win V2, see if it works for you.

You may export your private key and import it on your other computers, don't create a new private key for another computer. If you want to use a different ID for some other people, then you create another private key just for them.


An abstract in Chinese

绝对安全地传送电邮、短信和文件

这里介绍的加密方法没有任何第3方的介入也不需要交换密码,可以用于任何用途,比如QQ等。

双方都要安装GPG4Win 1.1.4,安装时选GnuPG2和GPA这两项就够了。双方都要用GPA的钥匙管理器产生一个自己的钥匙,然后把这个钥匙输出。可以用电邮、QQ等任何方式把这个输出的钥匙送给对方。注意这是公开的钥匙(public key),千万不要暴露你的密匙(Private Key)。

然后双方就可以用对方的钥匙来加密,加密后的东西只有对方能还原,所以可以用任何不安全的方式送给对方,比如通过电邮和QQ等,别人就是拿到了也没用。文件加密很方便,把文件拖到GPA的文件管理器就行了,然后选加密,问你钥匙用哪个时,用对方给你的那个。然后会生成一个*.PGP文件,把这个文件用任何你喜欢的方式送给对方,比如电邮和QQ等。对方收到后,把它拖到文件管理器里,解密,就成了。

如果使用QQ来说私密闺话的话,先像平常一样的写QQ短信,写好了先不要送出去,把内容复制一下。打开GPA的写字板,黏贴,加密,然后再复制和黏贴回QQ,这时就可以发送了。对方收到QQ短信后,复制,打开GPA的写字板,黏贴,解密,就可以看原来的内容了。

唯一需要小心的是,当某一方收到一个钥匙的时候,要跟对方核实一下确实是他(她)的。否则你往这个钥匙送东西的时候就送到歹人那里去了,而且歹人是能打开的,因为这个钥匙是歹人用自己的密匙输出的。每个钥匙都有自己的指印,双方可以用它或校验和来核实。

Thursday, February 7, 2013

Panasonic PZ 14-42mm vs. 14-45mm

The PZ has significantly more blurry edges, which is common with all kit lenses, Canon, Nikon, Sony, Olympus, Panasonic and etc.; Panasonic 14-45mm kit lens is the only exception.


This PZ lens is perfect for video though and the blurry edges, only seen while pixel peeping, won't show up in video. G5 has a power zoom rocker between the shutter and record buttons, making one-hand shooting possible with smooth zooming. PZ's AF also catches up with zooming speed well, as showing in this video:


These three 100% crops show the blurry edges against 14-45. The second is, obviously, from 14-45 and the first and third are from two different PZ lenses with a large gap between their serial numbers, 01LI9202###H vs. 01LI9211###H. Therefore, this is not about a specific bad copy but the common performance of the PZ.


Above images are cropped from the right edge with a 1/3 size. The left side is much better, no problem at all.  It would be much more preferred if Panasonic moves half of the blurry area to the left side. The camera is G5 at f/3.5 14mm.

You won't see any difference in real life photos:


as long as you don't do 100% crop at the edges:


The PZ is really an ideal match to the GF3 alike bodies (GF1, GF2, GF5 and GX1 etc.), making them quite pocketable. It also makes a G5 alike body (G1, G2, G3, GH1, GH2 and GH3 etc.) a lot easier to slide into a bag or a large coat pocket:


Will I spend $400 on this PZ? No, absolutely not, because it cannot match the edge sharpness of the 14-45mm. But for $279 mounted on a brand new GF3 body, then yes, good to have, especially for video and a body like G5 with a PZ rocker.