This article is about how to watch TV on a large TV. You should watch the following video for what you can get.
Fire TV or Fire TV Stick
You need one of these. It connects your TV to your home network and the Internet. The Stick is the cheap version for much less money, $40 vs. $100; it does not have a LAN port (WiFi only); and its CPU is slower. A remote is included.
After you connect it to your TV, powered on and connected to your network (WiFi or LAN), you'll be prompted to register. You may use your exist Amazon account, or create a new account on your computer. You may use a fake email address and don't need a credit card, if you are not going to download any apps from Amazon. You can change this account anytime, so no need to consider too much about what account to use.
After the initial registration and a short welcome video, you are in:
If you're going to use it as it is, i.e. what Amazon offers, you may stop now. If you want what you see in above Youtube, then continue.
Side load
First thing first, you must install at least one app. If you know how to use adb, then life is easy; otherwise follow this guide on how to side load apps to Fire TV.
Now side load the FireStarter. From now on, you simply press the home button on your remote to access all the apps you are going to install. Like this:
Chinese TV
In order to watch Chinese TV and soaps, you need to side load Shafa Market. Then you can have pretty much everything you need, as showing in above Youtube. To get you started, I recommend TV Plus 2.0 for watching TV stations like CCTV and etc. Later you can add more - whatever you like, such as UC Browser for TV.
For Chinese input, install Sougo Input for TV and watch above YouTube for how to enable/disable it anytime.
Kodi
Kodi is extremely powerful. Find it here and then side load it. You add contents by adding addons. To get you started, just click on VIDEOS and Add-ons, then Get more... You'll see a long list of available addons. Click on any one interesting to you and install, this content will be listed in Add-ons for you to watch.
More apps
Of course you may side load virtually any Android apps. But keep in mind that most apps are not remote friendly, because they are not made for Android TV but for phones and tablets that have a touchscreen. To get you started, give Mobdro a try. It is quite remote friendly and you'll be amazed, I guarantee.
Why not other such products?
It is not a restricted device - it is open Android. As you have seen above, you can do virtually anything you like. It is very good quality and extremely stable. It is cheap, often on sale for $75 or $20. No any fee, totally free, vast contents.
As always, I try to make the article focus on essential points without covering all the details; so please ask if any question.
Related articles:
How to watch local TV
Tuesday, December 15, 2015
Tuesday, December 8, 2015
Dell Venue 7140 WiFi workaround
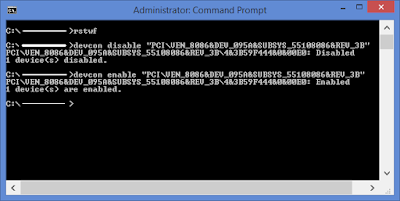
This tablet's WiFi needs a reset every now and then, I use a simple batch file to do it:
devcon disable "PCI\VEN_8086&DEV_095A&SUBSYS_55108086&REV_3B"
devcon enable "PCI\VEN_8086&DEV_095A&SUBSYS_55108086&REV_3B"
You need to create a batch file, say, rstwf.bat, in a folder and copy and paste above two lines into it. You also need to find the devcon.exe file on the net and put it into the same folder. To use it, open a Command Prompt as administrator and type rstwf.bat, enter.

Thursday, December 3, 2015
Moto E battery
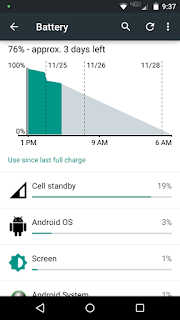
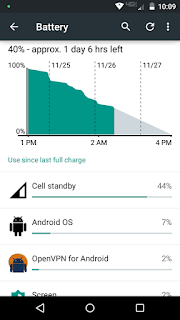
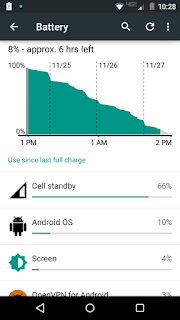
The following is a recording of my Moto E in three days, from fully charged down to 8%. It is mostly on WiFi and, sometimes, on LTE. It is used normally with three GMail accounts pushing, Google Voice for SMS pushing, Sipdroid receiving calls and Wechat pushing. I use the phone to browse the web with Dolphin about couple hours in a day.
This is one of the reasons I call it "King of phones"!
This is one of the reasons I call it "King of phones"!


Enable GSM on Verizon Moto E 5.1
All credits go to this XDA thread.
Follow exactly the following steps as showing in above video:
1. adb method
This method is the best if you have a PC around. Like above method, you don't need to redo it after a reboot or power cycle.
adb shell "settings put global preferred_network_mode 9"
adb shell "settings put global preferred_network_mode1 9"
adb shell "settings put global preferred_network_mode2 9"
Obviously, you can make a DOS batch file to run these commands.
2. No PC required
This method is handy when you need to swap to a GSM SIM card while no PC available, but you need to redo it after a reboot or SIM swap.
[update] If the phone still cannot pick up a GSM service after the 4G option checked: open the Network app, enter the menu at the top right corner and select radio band to "USA Band". Thank Supergo.
Follow exactly the following steps as showing in above video:
- Connect your Moto E on WiFi and open a web browser.
- Click on this link to install the Network app.
- Insert a GSM SIM card.
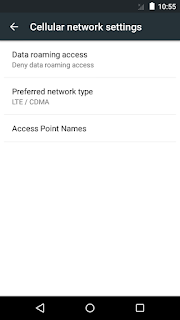
- Open Settings, More under Wireless & networks, Cellular networks and now you're in the "Cellular network settings" page. Don't touch the back button; instead, touch the home button so later you can easily return to this page.
- Turn on Airplane mode.
- Open the Network app, switch to LTE/GSM auto (PRL), then touch on "TURN ON RADIO" - just once and ignore what happens afterward.
- Return to the early "Cellular network settings" page by touching the square button at the right side. Touch "Preferred network type" and you have the 4G/3G/2G options that you've been dreaming for.
- Turn off Airplane mode and you're in. You don't need to redo it after a reboot or power cycle, but you do after a SIM swap. Thank jet360 on mitbbs.
1. adb method
This method is the best if you have a PC around. Like above method, you don't need to redo it after a reboot or power cycle.
- Install the USB drivers for Moto E.
- Enable adb USB on Moto E.
- Download a root package that has adb included, such as this one. Unzip it into a folder, say, c:\adb.
- Connect your phone to the PC, run the following commands from c:\adb:
adb shell "settings put global preferred_network_mode 9"
adb shell "settings put global preferred_network_mode1 9"
adb shell "settings put global preferred_network_mode2 9"
Obviously, you can make a DOS batch file to run these commands.
2. No PC required
This method is handy when you need to swap to a GSM SIM card while no PC available, but you need to redo it after a reboot or SIM swap.
- Install the Network app and open it after a GSM SIM inserted.
- Under "Set preferred network type", select the third from the bottom, i.e.:
- Then select immediately the second from the bottom, i.e.:
[update] If the phone still cannot pick up a GSM service after the 4G option checked: open the Network app, enter the menu at the top right corner and select radio band to "USA Band". Thank Supergo.
Wednesday, December 2, 2015
Philips SHE3010 Earbuds
I simply cannot live with in-ear headphones and thus I've always been looking for a pair of good sounding traditional earbuds. I saw these Philips SHE3010 in a Ross store for just $4.99 and they have got some good reviews on Amazon, so I gave them a try.
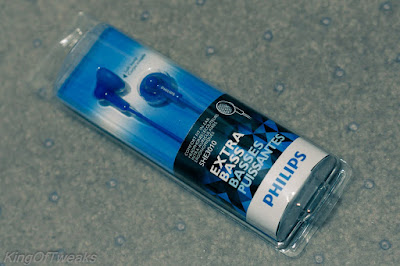
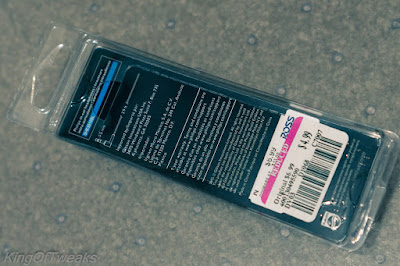
They sound good! As good as the YUIN PK3, if not better, for much less money.

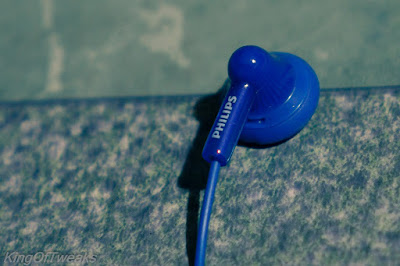
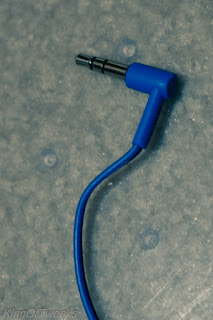
They sound even better after I put foam on them:
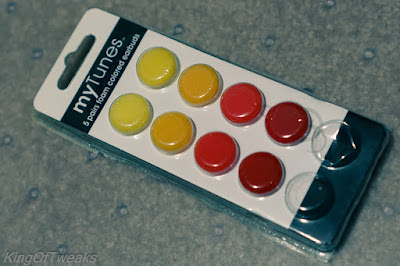

Then the "L" and "R" letters are covered by the foam, but I still can distinguish them by reading the "PHILIPS" from left to right:

Finally, there are some earbuds, in addition to the YUIN PK3, that sound good enough! Before, Koss KSC/35/75 are the only light-weight headphones that I could live with. These SHE3010 come with many different colors.
Specs:
Impedance: 16 ohm
Sensitivity: 107 dB
Speaker diameter: 14.8 mm
Freq. response: 9-22000 Hz
Max power input: 25 mW
Magnets: neodymium
Cable length: 1.2 m
Connector: 3.5 mm right angle
[update] I have been listening to these tiny buds for two weeks and they sound huge! The PK3 sounds good - the first pair of earbuds that I can live with, but too dark compared to these Philips. They are the best sounding and comfortable earbuds ever for the least money.


They sound good! As good as the YUIN PK3, if not better, for much less money.


They sound even better after I put foam on them:


Then the "L" and "R" letters are covered by the foam, but I still can distinguish them by reading the "PHILIPS" from left to right:

Finally, there are some earbuds, in addition to the YUIN PK3, that sound good enough! Before, Koss KSC/35/75 are the only light-weight headphones that I could live with. These SHE3010 come with many different colors.
Specs:
Impedance: 16 ohm
Sensitivity: 107 dB
Speaker diameter: 14.8 mm
Freq. response: 9-22000 Hz
Max power input: 25 mW
Magnets: neodymium
Cable length: 1.2 m
Connector: 3.5 mm right angle
[update] I have been listening to these tiny buds for two weeks and they sound huge! The PK3 sounds good - the first pair of earbuds that I can live with, but too dark compared to these Philips. They are the best sounding and comfortable earbuds ever for the least money.
Friday, November 27, 2015
Install apps the right way
Google Play Store is convenient to find and install apps on your phone, but it is a horrible thing and I never enable it on any of my phones, never.
Here is how I find and install apps on my phones:
In a browser, open this link to find your app:
https://play.google.com/store/apps
For example, you can search for "Notification Auto Clear" and get it at this URL:
https://play.google.com/store/apps/details?id=com.necta.notificationclear
Copy the link (URL), open the following link and paste. Then click on "Generate Download Link":
http://downloader-apk.com/
Then click on "generate download link" again, then click on "Proceed to Notification Auto Clear 1.0 (or the app name) apk Download Page". Wait for a few seconds (depending on the size of the app), your browser will pop up the download dialog:
Now your phone will start to download the apk file, once finished, simply click/open it to install the app.
If you did above steps on a computer, then you need to transfer the downloaded apk file to your phone, obviously. Then use a file browser to open/install the apk file. If your phone does not have any file browser yet, then you need to do above steps on your phone for a file browser such as ES File Explorer.
It is not so convenient but well worth it and once you are familiar with the process, it is quite easy.
[update] Another two very easy ways - just open the following URL's on your phone:
http://apkpure.com
http://apkmirror.com
Tuesday, November 24, 2015
Fix Acer Nettoop PC
Several years ago I bought two Acer AspireRevo nettop PC, AR1600 and AR3610, because they are convenient and cheap, ideal for HTPC (NVIDIA ION graphics) and server (small and quiet). The AR1600 started to crash during or after boot about a year ago, later the AR3610 followed exactly the same behavior.
I was going to throw them into the recycle bin; so I opened them up (only one screw) to destroy the hard drives:
Then I noticed a screw on the heat sink looked loose. I removed the fan, turned ou all the 4 screws were loose:
I tighten up these screws and both boxes came back into life again. When they were loose, the heat sink could not have good contact with the CPU and GPU. Then the CPU and GPU overheat soon after powered on.
Monday, November 16, 2015
Tweaking photo prints
It started when I was trying to print a photo to a glossy photo paper with a Canon MP600 printer, the output looked horrible. Recently I looked into this issue.
This is a sample photo I took with my a5100 camera and developed in Lightroom:
After many tries with different settings, I got good enough prints like this:
First, the paper type must match, in this case I use HP glossy photo paper so I select "Photo Paper Plus Glossy":
Then the key is to select ICM as color correction as showing above; so the printer driver will use inks in the way that's best for the selected type of paper.
That's it, quite simple, but be warned: you may not always get the right colors. ICM is pretty much a mess, never consistent and you have no control of it.
An important note: If your image file has an embedded ICC profile (so called a tagged image), this Windows' built-in photo printing utility always ignores that and won't use it for printing. What you see in the utility's preview pan is what you get in your prints.
Afterward, you still need to do the same settimgs as in above ICM method except this time select "None" instead of "ICM". Then you are good to go. ICC profile naming and paper type:
SP = Glossy, MP = Matte, PR = Pro
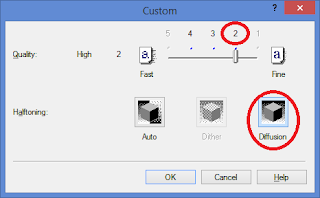
The # suffix means the highest quality available (the less, the higher). For example, SP2 means no quality 1 (as seen grayed out in the illustration above).
Although Lightroom still let you use your printer driver to manage color instead of using an ICC profile:
but no matter what I select in the printer settings, Driver Match, ICM, None, or whatever, I always get something like this:
Not too bad but not so correct neither with an obvious blue tint. After trying many different paper types and other settings, the best result comes from selecting "matte" as the media type for a plain paper:
Looks fantastic for a plain paper, doesn't it?
If you use a different printer and/or paper, your results may look different, but this article should lead you to the right direction. I have done lots of tests but I cannot write them all here - I always try to focus on the key parts, so please ask should you have a question.
This is a sample photo I took with my a5100 camera and developed in Lightroom:
After many tries with different settings, I got good enough prints like this:
ICM Printing
The easiest way to print a photo in Windows is to right click on the photo(s) and select print. This type of printing is based on ICM (Windows Image Color Management, or ColorSync on Mac) and the following settings are required to achieve the correct colors.First, the paper type must match, in this case I use HP glossy photo paper so I select "Photo Paper Plus Glossy":
Then the key is to select ICM as color correction as showing above; so the printer driver will use inks in the way that's best for the selected type of paper.
That's it, quite simple, but be warned: you may not always get the right colors. ICM is pretty much a mess, never consistent and you have no control of it.
An important note: If your image file has an embedded ICC profile (so called a tagged image), this Windows' built-in photo printing utility always ignores that and won't use it for printing. What you see in the utility's preview pan is what you get in your prints.
Color Managed Printing
If you use a so called "color managed" application such as Lightroom and Photoshop etc., then you must not use any printer driver's color correction but let the application use an ICC profile for color handling. In this case, "Canon MP600 SP2" is the profile for glossy papers:Afterward, you still need to do the same settimgs as in above ICM method except this time select "None" instead of "ICM". Then you are good to go. ICC profile naming and paper type:
SP = Glossy, MP = Matte, PR = Pro
The # suffix means the highest quality available (the less, the higher). For example, SP2 means no quality 1 (as seen grayed out in the illustration above).
Although Lightroom still let you use your printer driver to manage color instead of using an ICC profile:
but no matter what I select in the printer settings, Driver Match, ICM, None, or whatever, I always get something like this:
Now what about plain (non-photo) paper?
This is the result when plain paper is used and selected as the media type:Not too bad but not so correct neither with an obvious blue tint. After trying many different paper types and other settings, the best result comes from selecting "matte" as the media type for a plain paper:
Looks fantastic for a plain paper, doesn't it?
If you use a different printer and/or paper, your results may look different, but this article should lead you to the right direction. I have done lots of tests but I cannot write them all here - I always try to focus on the key parts, so please ask should you have a question.
To summerize:
- Use either ICM or ICC, never use both.
- If ICC is available, better use it, especially for photo papers. But YMMV, then try ICM.
- When use ICC, use the correct profile for the media type.
- For plain paper, the best color might be from selecting another media type.
Friday, November 6, 2015
Moen kitchen faucet leak
The 7560 faucet is very convenient and durable - 13 years of trouble free service. Eventually the spout started to leak water, down to the cab below the sink. The leak is even more in spray mode.
I bought an universal replacement from Homedepot for $22 and it works and the leak stopped immediately.
However, it is a little smaller to fit well into the seat; so I take out a plastic cup from the old spout and mount it onto the new one. Now everything is perfect.
I noticed that the spray mode is very gentle, nothing like the old spray which is VERY strong. If you are the original owner of the faucet, Moen will send you a replacement for free. The model # for the wand is 136829.
Wednesday, October 21, 2015
Current cameras
[In Chinese]
真快,一年过去了,又多了一批添了或者将要添娃的朋友,又临近Black Friday和Holidays,买相机的最佳时刻。
让人意想不到的是,在产品几乎一年一版的年代,最为推荐的还是索尼两岁多了的a6000和a5100,因为还没有直接的竞争对象,所以索尼也不急于更新。SAR(索尼谣言网站)一次又一次都是“狼来了”,结果到现在连下一代的名字,a6100还是a7000,都猜不出来。
这其实是好事,a6000和a5100真的各方面相当完善了,而价格,包括镜头,是越来越好。secondipity经常有两个套头(16-50和55-210)一起的套机才400刀。不太缺钱的,添一个SEL35F18,拍娃、花草、菜肴和扫街什么的、录像都够了,一头走天下,BestBuy经常有$310左右的deal。不愿意花那么多钱的,就填一个Sigma 30mm F2.8 for Sony E-Mount才$150,画质是实实在在1000刀的档次,实用性和SEL35F18无异(除了录像,因为没有防抖);或者SEL50F18,非常适合人像的拍摄和录像,BestBuy经常是不到$200。
上面说的这几个头你必须至少买一个,否则相机是白买了。所以考虑预算的时候,这个
一定要考虑进去,好在都不是很贵,不是问题。
如果需要变焦又不差钱的话,可以考虑索尼的SEL1670Z,体积不算太大,画质比套头好
多了。现在一般700刀一下能找到。
说到这,索尼的问题就在这,差不多也就这么几个头了。还有一些全幅的头,都贵得要
死。不过最该有的倒是都有了,反而是松下到目前为止都还没有一个能同时胜任照相和
录像的标准头。
需要更多的镜头选择的话,就得考虑M43了(Micro Four Thirds),首选是松下的G7,其
次是噢林帕斯的E-M10 II。
E-M10 II样样都好,但是所有的噢林帕斯都有两个弱项:连续对焦和录像。因为采用的
是对比度对焦(CDAF)而不是相位对焦(PDAF),所以连续对焦(比如追娃)不理想。
E-M10 II的录像跟以前相比,有了长足的进步 - 5轴防抖和1080P60,但是画质和自动
对焦还是不如松下。
除了镜头多之外,噢林帕斯另一个最大的优势是相机照片直出,比索尼和松下好多了,
基本上不必须用RAW,直接用相机出来的JPEG就够好了。
G7基本上没有什么弱项,包括比较合理的定价,而且有4K录像、电子快门等众多非常好
的功能。虽然也是CDAF,但是松下加入了基于数据库的人工智能,连续对焦效果还是令
人满意的。录像一直是松下的长项,包括自动对焦,没啥说的,只是自动对焦还没有达
到索尼那样完美无缺的程度。
M43的传感器比索尼的APS-C小一些,这其实不是什么问题,高感(ISO)、动态范围(
DR)和景深(DoF)都差不多,不要因为这些把M43排斥在外。网络上很多人还在拿3-4
年以前的M43传感器在说事。倒是16M的像素在做裁剪(crop)的时候不是很富裕。用定
焦头的时候经常需要crop,像素够高的话,出来的画质,甚至100%的crop,都比套头的
画质更好。所以我个人现在基本上对套头没有什么兴趣,索尼传感器的像素是24M。
去年这时候,松下还没有一个比较理想的镜头。20mm f/1.7的神饼画质没说的,对焦不
尽人意,尤其是录像时。25mm f1.4太贵了,没有防抖也不好录像。现在有两个有些意
思的不太贵的大光圈头了:42.5 1.7和25 1.7。不过还是不够理想,前者比标准焦距长
出不少(85mm vs 50mm),室内不好施展(拍录单个人头像还行);后者是标准焦距,
但是没有防抖不好录像。有防抖的30mm的微距头可以凑合当标准挂机头,只是f2.8的最
大光圈照人像时略显不够。需要变焦又不差钱的,可以考虑12-35mm和35-100mm f2.8,
都有防抖很适合录像,就是光圈小了点。虽说Olympus的头都可以用在Panasonic上,但
是都没有防抖(噢林帕斯采用机身内防抖),而松下的机子里面只有GX7这一台有机身
防抖而且还不能用于录像。所以你看,如果买松下的话,真的不如就买内置12-37.5mm
f1.7-2.8莱卡镜头的LX100算了,还有4K录像又便携,一起才$800还时常有$600的丢。
去年这个时候还没有值得考虑的更高档的相机:索尼的A7全幅系列的对焦都还不行(除
了12M像素的A7S),传统单反尤其是全幅的太大太笨太重,而且都不好用于录像(除了
70D,但是70D很多都有中心对焦问题)。
今年不同了,至少有两个新索尼全幅可以考虑:RX1R II和A7R II。两者相对而言,前
者较轻巧和便宜,应该是非专业人士的首选,唯一的不足是:给孩子踢足球拍摄时的焦
距(35mm)短了些。不过42M的全幅像素放大起来应该是比较充裕的,如果能像a6000和
a5100那样有2X的无损zoom的话,较远距离的录像也凑合了。
三星的NX1和NX500怎么样?缺乏一个适合录像的象SEL35F18那样的带防抖的标准头。三
星的东西纸面上看都是非常的前卫、非常的完美,拿到手上之后往往会有一些似乎细小
的但是致命的问题,而三星的风格是永远不会再理会这些“小”问题,因为他们总是全
身心地忙于开发更前卫的新版。几年前的Galaxy手机是个例外,在售后的完善更新方面
有改进,所以成绩很好。但是这几年做大了,又回归本色了。三星的东西还都标价离谱
,贬值迅速,所以到目前为止我还没敢碰过,尽管各方面评价都很好。
富士怎么样?对焦和录像都还不够好,杰出优点是相机JPEG直出的色彩,甚至能模拟
Kodakchrome的色彩(Classic Chrome)。
XT-1/10采用相位对焦,肯定是比其它富士型号这方面好多了,但是网上的反映褒贬不
一,有些人说和固件版本、镜头和光线有关。
我在BB里摸过这两台机器,感觉对焦速度明显不如a6000和现在的噢林帕斯和松下,跟
较早的噢林帕斯PEN的速度差不多(不算很慢)。虽说是相位对焦,我的感觉还像是对
比度对焦那种拉风箱的过程,没有a6000那种立马一步到位的爽快感。没试连续对焦,
据说可以实用,这里Metal有大量X-T10 + 56/1.2的抓拍例子。
索尼RX100怎么样?传感器还是太小了。如果你实在是要一个装口袋里的相机,而松下
的GM5、LX100和噢林帕斯的E-PM3还是嫌大了些的话,那就只有这个了。
莱卡Q怎么样?莱卡终于有了个普通消费者能用的全幅相机 - AF(自动对焦)、EVF(
电子取景器)、光学防抖和1080p60录像,但是索尼RX1R II这一出来,立马又相形见绌
了些 - 无论是性能、功能还是价格和便携上。不过买LV和阿马仕的朋友们是不管这些
的,价格低了还不买呢。
佳能EOSM怎么样?对焦不行,包括录像的AF。
尼康One怎么样?传感器太小了,还不能像RX100那样装口袋里,毫无意义的东西。
尼康和佳能都还没有做一个能用的小相机的意思,否则它们的单反怎么办?已经一直在
大幅下滑了,再自己给自己的背后捅一刀?它们的境地非常困难:它们的优势是现有镜
头群,但是都不能直接用到无镜相机上去(法兰距和对焦方式不兼容);玩转接的话,
人们为什么非要用它们的机身来玩(索尼已经远远走在前面了)?
个别BestBuy的店子,比如Portland地区在机场边的那一个,陈列的相机非常多,包括
几乎所有上面提到的相机,可以去亲手摸摸。BB的店子里经常有非常低价的open box,
路过的时候记得问问,我的a6000、a5100和a5000套机都是这样买的,比半价还低,状
况都和新的一样。
其实说了半天都是浮云,在数码时代,相机和镜头只是开始,最终能给你带来好照片的
是Lightroom,花点时间看看这段视频比倒腾什么器材都更管用。
【注:我和秋凉摄影没有任何关联,就是发现这伙计把LR讲的最为简洁又非常的踩点,合
我的口味。这里是全套】
如果没有时间去全面学习的话,可以走捷径,到这里下载模拟KodakChrome的预置文件:
解压后放到这个目录下面:
C:\Users\[UserName]\AppData\Roaming\Adobe\Lightroom\Develop Presets\User
Presets
你就可以轻松搞出大家公认的最漂亮的柯达经典色彩来:
这是之前的:
真快,一年过去了,又多了一批添了或者将要添娃的朋友,又临近Black Friday和Holidays,买相机的最佳时刻。
让人意想不到的是,在产品几乎一年一版的年代,最为推荐的还是索尼两岁多了的a6000和a5100,因为还没有直接的竞争对象,所以索尼也不急于更新。SAR(索尼谣言网站)一次又一次都是“狼来了”,结果到现在连下一代的名字,a6100还是a7000,都猜不出来。
 |
| a5100 w/ Sony 35/1.8 OSS |
 |
| a6000 w/ Sigma 30/2.8 mounted and Sony 50/1.8 OSS beside |
一定要考虑进去,好在都不是很贵,不是问题。
如果需要变焦又不差钱的话,可以考虑索尼的SEL1670Z,体积不算太大,画质比套头好
多了。现在一般700刀一下能找到。
说到这,索尼的问题就在这,差不多也就这么几个头了。还有一些全幅的头,都贵得要
死。不过最该有的倒是都有了,反而是松下到目前为止都还没有一个能同时胜任照相和
录像的标准头。
需要更多的镜头选择的话,就得考虑M43了(Micro Four Thirds),首选是松下的G7,其
次是噢林帕斯的E-M10 II。
E-M10 II样样都好,但是所有的噢林帕斯都有两个弱项:连续对焦和录像。因为采用的
是对比度对焦(CDAF)而不是相位对焦(PDAF),所以连续对焦(比如追娃)不理想。
E-M10 II的录像跟以前相比,有了长足的进步 - 5轴防抖和1080P60,但是画质和自动
对焦还是不如松下。
除了镜头多之外,噢林帕斯另一个最大的优势是相机照片直出,比索尼和松下好多了,
基本上不必须用RAW,直接用相机出来的JPEG就够好了。
G7基本上没有什么弱项,包括比较合理的定价,而且有4K录像、电子快门等众多非常好
的功能。虽然也是CDAF,但是松下加入了基于数据库的人工智能,连续对焦效果还是令
人满意的。录像一直是松下的长项,包括自动对焦,没啥说的,只是自动对焦还没有达
到索尼那样完美无缺的程度。
M43的传感器比索尼的APS-C小一些,这其实不是什么问题,高感(ISO)、动态范围(
DR)和景深(DoF)都差不多,不要因为这些把M43排斥在外。网络上很多人还在拿3-4
年以前的M43传感器在说事。倒是16M的像素在做裁剪(crop)的时候不是很富裕。用定
焦头的时候经常需要crop,像素够高的话,出来的画质,甚至100%的crop,都比套头的
画质更好。所以我个人现在基本上对套头没有什么兴趣,索尼传感器的像素是24M。
去年这时候,松下还没有一个比较理想的镜头。20mm f/1.7的神饼画质没说的,对焦不
尽人意,尤其是录像时。25mm f1.4太贵了,没有防抖也不好录像。现在有两个有些意
思的不太贵的大光圈头了:42.5 1.7和25 1.7。不过还是不够理想,前者比标准焦距长
出不少(85mm vs 50mm),室内不好施展(拍录单个人头像还行);后者是标准焦距,
但是没有防抖不好录像。有防抖的30mm的微距头可以凑合当标准挂机头,只是f2.8的最
大光圈照人像时略显不够。需要变焦又不差钱的,可以考虑12-35mm和35-100mm f2.8,
都有防抖很适合录像,就是光圈小了点。虽说Olympus的头都可以用在Panasonic上,但
是都没有防抖(噢林帕斯采用机身内防抖),而松下的机子里面只有GX7这一台有机身
防抖而且还不能用于录像。所以你看,如果买松下的话,真的不如就买内置12-37.5mm
f1.7-2.8莱卡镜头的LX100算了,还有4K录像又便携,一起才$800还时常有$600的丢。
去年这个时候还没有值得考虑的更高档的相机:索尼的A7全幅系列的对焦都还不行(除
了12M像素的A7S),传统单反尤其是全幅的太大太笨太重,而且都不好用于录像(除了
70D,但是70D很多都有中心对焦问题)。
今年不同了,至少有两个新索尼全幅可以考虑:RX1R II和A7R II。两者相对而言,前
者较轻巧和便宜,应该是非专业人士的首选,唯一的不足是:给孩子踢足球拍摄时的焦
距(35mm)短了些。不过42M的全幅像素放大起来应该是比较充裕的,如果能像a6000和
a5100那样有2X的无损zoom的话,较远距离的录像也凑合了。
三星的NX1和NX500怎么样?缺乏一个适合录像的象SEL35F18那样的带防抖的标准头。三
星的东西纸面上看都是非常的前卫、非常的完美,拿到手上之后往往会有一些似乎细小
的但是致命的问题,而三星的风格是永远不会再理会这些“小”问题,因为他们总是全
身心地忙于开发更前卫的新版。几年前的Galaxy手机是个例外,在售后的完善更新方面
有改进,所以成绩很好。但是这几年做大了,又回归本色了。三星的东西还都标价离谱
,贬值迅速,所以到目前为止我还没敢碰过,尽管各方面评价都很好。
富士怎么样?对焦和录像都还不够好,杰出优点是相机JPEG直出的色彩,甚至能模拟
Kodakchrome的色彩(Classic Chrome)。
XT-1/10采用相位对焦,肯定是比其它富士型号这方面好多了,但是网上的反映褒贬不
一,有些人说和固件版本、镜头和光线有关。
我在BB里摸过这两台机器,感觉对焦速度明显不如a6000和现在的噢林帕斯和松下,跟
较早的噢林帕斯PEN的速度差不多(不算很慢)。虽说是相位对焦,我的感觉还像是对
比度对焦那种拉风箱的过程,没有a6000那种立马一步到位的爽快感。没试连续对焦,
据说可以实用,这里Metal有大量X-T10 + 56/1.2的抓拍例子。
索尼RX100怎么样?传感器还是太小了。如果你实在是要一个装口袋里的相机,而松下
的GM5、LX100和噢林帕斯的E-PM3还是嫌大了些的话,那就只有这个了。
莱卡Q怎么样?莱卡终于有了个普通消费者能用的全幅相机 - AF(自动对焦)、EVF(
电子取景器)、光学防抖和1080p60录像,但是索尼RX1R II这一出来,立马又相形见绌
了些 - 无论是性能、功能还是价格和便携上。不过买LV和阿马仕的朋友们是不管这些
的,价格低了还不买呢。
佳能EOSM怎么样?对焦不行,包括录像的AF。
尼康One怎么样?传感器太小了,还不能像RX100那样装口袋里,毫无意义的东西。
尼康和佳能都还没有做一个能用的小相机的意思,否则它们的单反怎么办?已经一直在
大幅下滑了,再自己给自己的背后捅一刀?它们的境地非常困难:它们的优势是现有镜
头群,但是都不能直接用到无镜相机上去(法兰距和对焦方式不兼容);玩转接的话,
人们为什么非要用它们的机身来玩(索尼已经远远走在前面了)?
个别BestBuy的店子,比如Portland地区在机场边的那一个,陈列的相机非常多,包括
几乎所有上面提到的相机,可以去亲手摸摸。BB的店子里经常有非常低价的open box,
路过的时候记得问问,我的a6000、a5100和a5000套机都是这样买的,比半价还低,状
况都和新的一样。
其实说了半天都是浮云,在数码时代,相机和镜头只是开始,最终能给你带来好照片的
是Lightroom,花点时间看看这段视频比倒腾什么器材都更管用。
【注:我和秋凉摄影没有任何关联,就是发现这伙计把LR讲的最为简洁又非常的踩点,合
我的口味。这里是全套】
如果没有时间去全面学习的话,可以走捷径,到这里下载模拟KodakChrome的预置文件:
解压后放到这个目录下面:
C:\Users\[UserName]\AppData\Roaming\Adobe\Lightroom\Develop Presets\User
Presets
你就可以轻松搞出大家公认的最漂亮的柯达经典色彩来:
这是之前的:
Saturday, September 12, 2015
Penclic mouse, what's the point?
It is just a small ordinary mouse with a dumb bar hanging on the top.
It is even not ergonomic (its advertized selling point), because the scrolling wheel is not on the pen but still on the mouse like a normal mouse. So your finger must fly between the wheel and the buttons, all the time. Further more, the buttons are located too low, you still have to twist your arm, like working with a traditional mouse, to reach these buttons.
Why not just make a real pen without the mouse base? Obviously, there are plenty of space to seat the optical sensor, the wheel and the battery, all within a single pen body. At least, move the wheel onto the pen body and move the buttons higher, then it would be truly an ergonomic and revolutionary mouse/pen.
My workaround:
Modify the back and forward buttons to be scroll down and up. Then I no longer need to touch that stupidly located wheel. A very simple AHK script can do it:
xbutton1::
MouseClick,WheelUp,,,5,0,D,R
return
xbutton2::
MouseClick,WheelDown,,,5,0,D,R
return
Now I can conveniently use my thumb to scroll up and down, but it is still an awkward device. Swapping left and right buttons might make it more comfortable, but I'm done with it and it is going back to the store.
Friday, September 4, 2015
Three essential tweaks for FireFox
The following tweaks work for all Mozilla based browsers such as FireFox, Light, WaterFox, Pale Moon and etc.
RememberPass add-on
This add-on forces FireFox to remember passwords for sites that do not want you to.
Toggle animated GIFs
Not only very annoying and distracting, animated images also consume computer resources (i.e. slow down), run them hot and drain your laptop's battery. With this add-on, you can make them quiet by default and, when you do want to see the action, click on them to play.
For Flash, you can, and you should, make the plugin to always "Ask to Activate":
UserContent.css
There are two more annoying things to block: scrolling (marquee) and blinking text. Find the profile directory (e.g., Palemoon\User\Palemoon\Profiles\Default) and create a new folder "chrome". Within this new folder, create a new file "UserContent.css" and copy and paste these two lines into it:
marquee { -moz-binding: none; }
blink { text-decoration: none ! important; }
Then restart your browser. Don't worry, you can still see the text in full, just not scrolling nor blinking, nice, ha.
All above methods has no side effects like ad and flash block add-on while making your browsing experience entirely calm.
Watch this video for before and after:
Subscribe to:
Comments (Atom)


